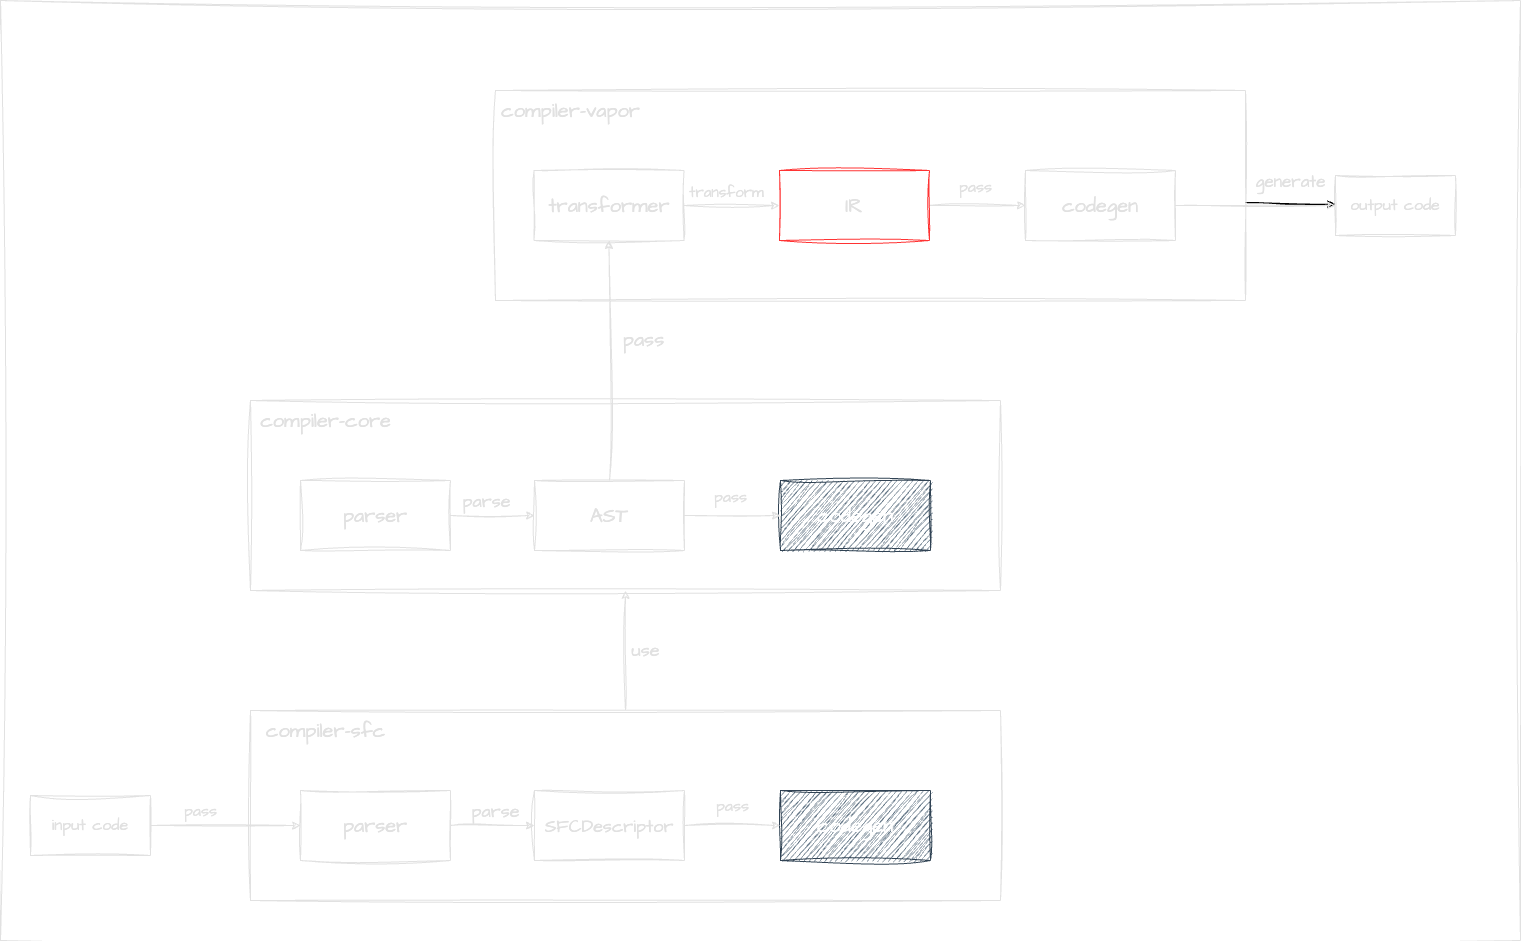
Vapor Mode の IR
さて続いては IR です.
この辺りから Vapor Mode の固有実装になります.

先に IR をみてから,transformer のソースコードリーディングに進むことにします.
IR とは
IR は Intermediate Representation の略で,中間表現のことです.SFCDescriptor や AST が概ねユーザー(Web アプリケーション開発者)の入力コードを構造化したものだったのに対し,IR は言わば「出力コードを構造化したもの」です.IR の定義は ir/index.ts にあります.
packages/compiler-vapor/src/ir/index.ts
最初に読んだ小さいコンポーネントのコンパイラ結果を思い出して欲しいのですが,
import { template as _template } from "vue/vapor";
const t0 = _template("<p>Hello, Vapor!</p>");
function _sfc_render(_ctx) {
  const n0 = t0();
  return n0;
}
これらを AST からそのまま出力するのはやや難しいです.
戦略として,上記のコードの表現するためのオブジェクトを用意 (IR) し,AST を操作することで IR を生成し,その IR を codegen に渡すことでプログラマブルにコンパイラを設計することができます.
実際に,上記のコンポーネントがどのような IR になるか試しに見てみます.
手元のコンパイラにログを仕込むことで確認します.
以下のあたりに transform 関数があるので,transform 後の ir を出力してみます.
76  const ir = transform(
77    ast,
78    extend({}, resolvedOptions, {
79      nodeTransforms: [
80        ...nodeTransforms,
81        ...(options.nodeTransforms || []), // user transforms
82      ],
83      directiveTransforms: extend(
84        {},
85        directiveTransforms,
86        options.directiveTransforms || {}, // user transforms
87      ),
88    }),
89 ){
"type": 0,
"node": {
"type": 0,
"source": "\n <p>Hello, Vapor!</p>\n",
"children": [
{
"type": 1,
"tag": "p",
"ns": 0,
"tagType": 0,
"props": [],
"children": [
{
"type": 2,
"content": "Hello, Vapor!"
}
]
}
],
"helpers": {},
"components": [],
"directives": [],
"hoists": [],
"imports": [],
"cached": [],
"temps": 0
},
"source": "\n <p>Hello, Vapor!</p>\n",
"template": ["<p>Hello, Vapor!</p>"],
"component": {},
"directive": {},
"block": {
"type": 1,
"node": {
"type": 0,
"source": "\n <p>Hello, Vapor!</p>\n",
"children": [
{
"type": 1,
"tag": "p",
"ns": 0,
"tagType": 0,
"props": [],
"children": [
{
"type": 2,
"content": "Hello, Vapor!"
}
]
}
],
"helpers": {},
"components": [],
"directives": [],
"hoists": [],
"imports": [],
"cached": [],
"temps": 0
},
"dynamic": {
"flags": 1,
"children": [
{
"flags": 1,
"children": [
{
"flags": 1,
"children": []
}
],
"id": 0,
"template": 0
}
]
},
"effect": [],
"operation": [],
"returns": [0]
}
}これが実際の IR です.
IR の type が enum で表現されている兼ね合いで数値になってしまい分かりづらいので,具体的な IR Node 名に置き換えてみつつ,余計なところを削除してみます.
そうすると以下のようなものになります.
{
  "type": "RootIRNode",
  "node": {
    "type": "RootNode",
    "source": "\n  <p>Hello, Vapor!</p>\n",
    "children": [
      {
        "type": "ElementNode",
        "tag": "p",
        "ns": 0,
        "tagType": 0,
        "children": [
          {
            "type": "TextNode",
            "content": "Hello, Vapor!"
          }
        ]
      }
    ],
    "temps": 0
  },
  "source": "\n  <p>Hello, Vapor!</p>\n",
  "template": ["<p>Hello, Vapor!</p>"],
  "block": {
    "type": "BlockIRNode",
    "node": {
      "type": "ElementNode",
      "source": "\n  <p>Hello, Vapor!</p>\n",
      "children": [
        {
          "type": "ElementNode",
          "tag": "p",
          "ns": 0,
          "tagType": "Element",
          "children": [
            {
              "type": "TextNode",
              "content": "Hello, Vapor!"
            }
          ]
        }
      ],
      "temps": 0
    },
    "returns": [0]
  }
}
まずルートに RootIRNode があります.これが IR の Root になります.
この RootIRNode は node, template, block の情報を持っていて,node は AST の RootNode になっています.
56export interface RootIRNode {
57  type: IRNodeTypes.ROOT
58  node: RootNode
59  source: string
60  template: string[]
61  component: Set<string>
62  directive: Set<string>
63  block: BlockIRNode
64}そして,block には BlockIRNode があり,これが Vapor で扱う要素の単位である,Block を表現したものになります.
63 block: BlockIRNode47export interface BlockIRNode extends BaseIRNode {
48 type: IRNodeTypes.BLOCK
49 node: RootNode | TemplateChildNode
50 dynamic: IRDynamicInfo
51 effect: IREffect[]
52 operation: OperationNode[]
53 returns: number[]
54}ここで少し Block の説明です.
Block とは
Block は Vapor Mode で扱う単位です.
非 Vapor で言うところの VNode (仮想 DOM の Node) に近いものです.
Block の定義は runtime-vapor にあるので少しみてみましょう.
26export type Block = Node | Fragment | ComponentInternalInstance | Block[]
27export type Fragment = {
28  nodes: Block
29  anchor?: Node
30  [fragmentKey]: true
31}
これをみると Block が概ねどういうものがわかるはずです.Block は Node (DOM Node), Fragment, Component または Block の配列を取ります.
基本的には Vapor はこの Block という単位で UI を構築していきます.
例えば,
const t0 = template("<p>Hello, Vapor!</p>");
const n0 = t0();
の n0 は Node (Element) という Block になります.
詳しくはまたランタイムの解説の方でみますが,ちらっと template という関数を見てましょう.
2export function template(html: string) {
3  let node: ChildNode
4  const create = () => {
5    // eslint-disable-next-line no-restricted-globals
6    const t = document.createElement('template')
7    t.innerHTML = html
8    return t.content.firstChild!
9  }
10  return (): Node => (node || (node = create())).cloneNode(true)
11}
単に,innerHTML に template を挿入し,その firstChild を返しているだけです.
つまりこれはただの ElementNode です.
時には Element だったり,Component だったり,またそれらの配列から構成されたものだったり,Block というのはこの UI の構築するための最小単位です.
将来的にはこの Block に対してイベントリスナを登録したり,テキストの更新を行ったり,といった操作を行うことになります.
各 IR の定義はこれからいろんなコンポーネントを読んでいきながら登場したものを随時読んでいこうと思うので,ここで IR の説明は終わりにします.
とりあえず,IR というものが雰囲気どういうものだったというのと,最初に読んでいる小さいコンポーネントがどのような IR で表現されているのかということがわかれば十分です.
