key属性とパッチレンダリング(Basic Virtual DOM部門スタート)
重大なバグ
実は今の chibivue のパッチレンダリングには重大なバグが存在しています.
パッチレンダリングの実装をした際に,
patchChildren に関して、本来は key 属性などを付与して動的な長さの子要素に対応したりしないといけない
と言ったのを覚えているでしょうか.
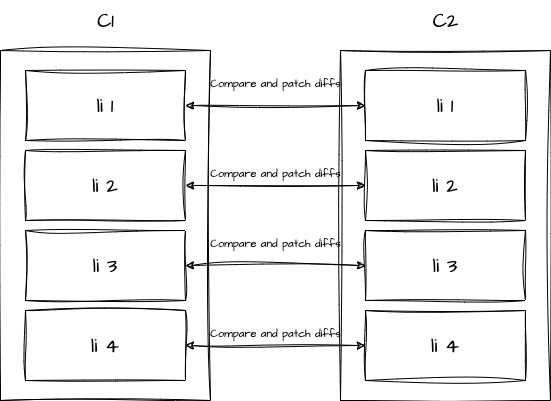
実際にどのような問題が起こるのか確かめてみましょう. 現時点での実装だと,patchChildren は以下のような実装になっています.
const patchChildren = (n1: VNode, n2: VNode, container: RendererElement) => {
  const c1 = n1.children as VNode[]
  const c2 = n2.children as VNode[]

  for (let i = 0; i < c2.length; i++) {
    const child = (c2[i] = normalizeVNode(c2[i]))
    patch(c1[i], child, container)
  }
}
これは,c2(つまり次の vnode)の長さを基準にループを回しています. つまり,c1 と c2 が同じ要素の場合にしか基本的には成り立っていないのです.
例えば,要素が減っていた場合を考えてみましょう. patch のループは c2 を基本としているわけなので,4 つめの要素の patch が行われません.
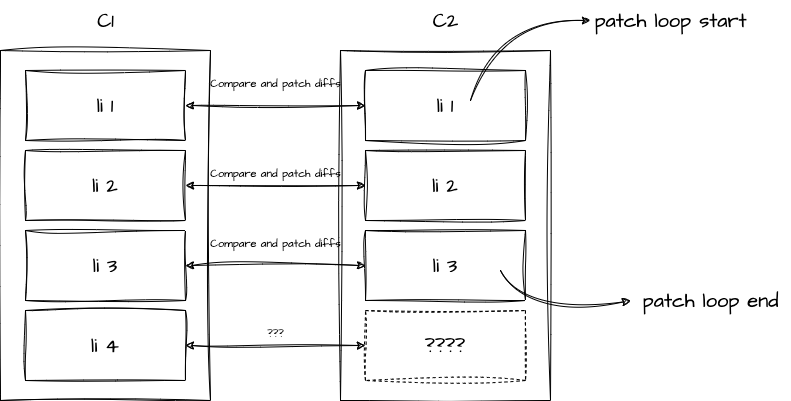
このようになった時,どうなるかというと,単純に 1~3 つ目の要素は更新され,4 つ目は消えず, c1 のものが残ってしまいます.
実際に動作を見てみましょう.
import { createApp, h, reactive } from 'chibivue'

const app = createApp({
  setup() {
    const state = reactive({ list: ['a', 'b', 'c', 'd'] })
    const updateList = () => {
      state.list = ['e', 'f', 'g']
    }

    return () =>
      h('div', { id: 'app' }, [
        h(
          'ul',
          {},
          state.list.map(item => h('li', {}, [item])),
        ),
        h('button', { onClick: updateList }, ['update']),
      ])
  },
})

app.mount('#app')
update ボタンを押すと以下のようになるかと思います.
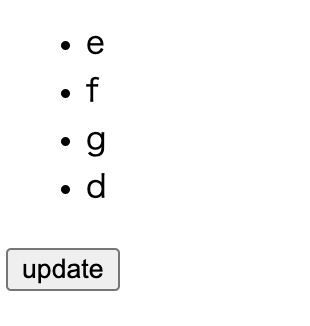
list は["e", "f", "g"]に更新したはずなのに,dが残ってしまっています.
そして,実は問題はこれだけではありません.要素が差し込まれた時のことを考えてみましょう. 現状では,c2 を基準にループを回しているだけなので,以下のようになってしまいます.
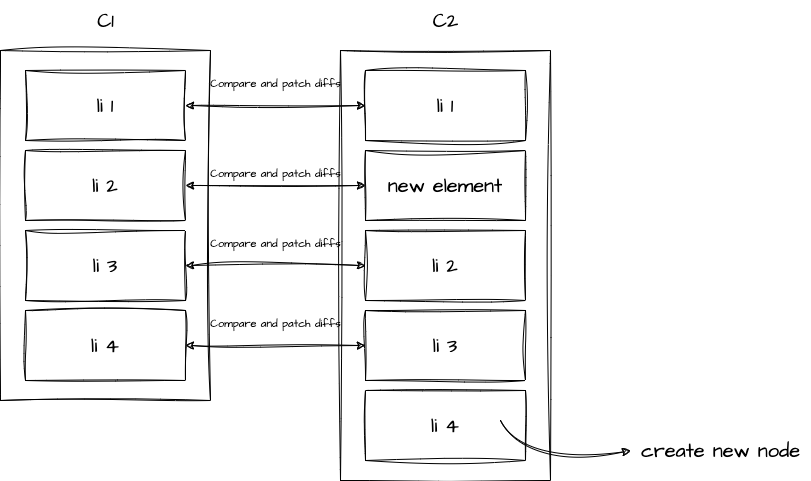
しかし,実際に差し込まれたのはnew elementで,比較は c1,c2 のそれぞれの li 1, li 2, li 3, li 4 同士で行いたいはずです.
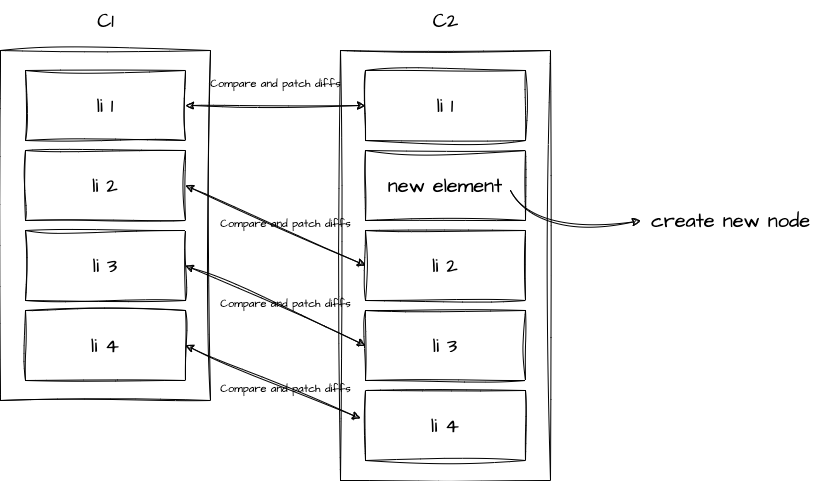
これらの二つの問題に共通して言えることは,「c1 と c2 で同一視したい node が判断できない」ということです.
これを解決するには,要素に key を付与し,その key を元にパッチを行う必要があります.
ここで,Vue のドキュメントで key 属性についての説明を見てみましょう.
特別な属性 key は、主に Vue の Virtual DOM アルゴリズムが新しいノードリストを古いリストに対して差分する際に、vnode を識別するためのヒントとして使用されます。
https://ja.vuejs.org/api/built-in-special-attributes.html#key
いかにも,と言ったところです.よく,「v-for の key に index を指定するな」という話があると思いますが,まさに今現時点では暗黙的に key が index になっているがために上記のような問題が発生していました.(c2 の長さを基準に for を回し,その index を元に c1 と patch を行っている)
key 属性を元に patch しよう
そしてこれらを実装しているのが,``という関数です.(本家 Vue で探してみましょう.)
方針としては,まず新しい node の key と index のマップを生成します.
let i = 0
const l2 = c2.length
const e1 = c1.length - 1 // end index of prev node
const e2 = l2 - 1 // end index of next node

const s1 = i // start index of prev node
const s2 = i // start index of next node

const keyToNewIndexMap: Map<string | number | symbol, number> = new Map()
for (i = s2; i <= e2; i++) {
  const nextChild = (c2[i] = normalizeVNode(c2[i]))
  if (nextChild.key != null) {
    keyToNewIndexMap.set(nextChild.key, i)
  }
}
本家の Vue ではこの patchKeyedChildren は5のパートに分かれます.
- sync from start
- sync from end
- common sequence + mount
- common sequence + unmount
- unknown sequence
ですが,上の 4 つは最適化のようなものなので,機能的には最後の unknown sequence だけで動作可能します. なので,まずはunknown sequenceの部分を読み進めて実装することにしましょう.
まずは,要素の移動のことは忘れて,key を元に VNode を patch していきましょう. 先ほど作ったkeyToNewIndexMapを利用して,n1 と n2 の組を算出して patch します. この時点で,新しくマウントするものや,アンマウントする必要があればその処理も行ってしまいます.
ざっくりいうとこういうこと ↓ (かなり省略しています.詳しくは vuejs/core の renderer.ts を読んでみてください.)
const toBePatched = e2 + 1
const newIndexToOldIndexMap = new Array(toBePatched) // 新indexと旧indexとのマップ
for (i = 0; i < toBePatched; i++) newIndexToOldIndexMap[i] = 0

// e1 (旧 len)を元にループ
for (i = 0; i <= e1; i++) {
  const prevChild = c1[i]
  newIndex = keyToNewIndexMap.get(prevChild.key)
  if (newIndex === undefined) {
    // 移動先が見つからなければアンマウント
    unmount(prevChild)
  } else {
    newIndexToOldIndexMap[newIndex] = i + 1 // マップ形成
    patch(prevChild, c2[newIndex] as VNode, container) // パッチ処理
  }
}

for (i = toBePatched - 1; i >= 0; i--) {
  const nextIndex = i
  const nextChild = c2[nextIndex] as VNode
  if (newIndexToOldIndexMap[i] === 0) {
    // マップが存在しない(初期値のまま)のであれば新しくマウントするということになる。 (真にはあって、旧にはないということなので)
    patch(null, nextChild, container, anchor)
  }
}
要素の移動
手法
Node.insertBefore
現時点では,key の一致のよってそれぞれの要素を更新しているだけなので,移動していた場合は所定の位置に移動させる処理を書かなくてはなりません.
まず,どうやって要素を移動するかについてですが,nodeOps の insert に anchor の指定をします. anchor というのは名前の通りアンカーで,runtime-dom に実装した nodeOps を見てもらえればわかるのですが,この insert メソッドはinsertBeforeというメソッドで実装されています.
export const nodeOps: Omit<RendererOptions, 'patchProp'> = {
  // .
  // .
  // .
  insert: (child, parent, anchor) => {
    parent.insertBefore(child, anchor || null)
  },
}
このメソッドは第二引数に node を渡すことで,その node の直前に insert されるようになります.
https://developer.mozilla.org/en-US/docs/Web/API/Node/insertBefore
これを利用して実際の DOM を移動させます.
LIS (Longest Increasing Subsequence)
そして,どのように移動のアルゴリズムを書いていくかですが,こちらはちょっとだけ複雑です.
DOM 操作というのは JS を動かすのに比べてかなりコストが高いので,なるべく余計な移動がないように移動回数は最小限にしたいのです.
そこで,「最長増加部分列 (Longest Increasing Subsequence)」というものを利用します.
これがどのようなものかというと,名前の通りなんですが,最長の増加部分列です.
増加部分列というのは,例えば以下のような配列があったとき,
[2, 4, 1, 7, 5, 6]増加部分列は以下のようにいくつか存在します.
[2, 4]
[2, 5]
.
.
[2, 4, 7]
[2, 4, 5]
.
.
[2, 4, 5, 6]
.
.
[1, 7]
.
.
[1, 5, 6]
増加している部分列です.このうち,最長のものが「最長増加部分列」です.
つまり,今回で言うと,[2, 4, 5, 6]が最長増加部分列となります. そして,Vue ではこの 2, 4, 5, 6 に該当する index を結果の配列として扱っています. (つまり [0, 1, 4, 5]).
ちなみにこんな感じの関数です.
function getSequence(arr: number[]): number[] {
  const p = arr.slice()
  const result = [0]
  let i, j, u, v, c
  const len = arr.length
  for (i = 0; i < len; i++) {
    const arrI = arr[i]
    if (arrI !== 0) {
      j = result[result.length - 1]
      if (arr[j] < arrI) {
        p[i] = j
        result.push(i)
        continue
      }
      u = 0
      v = result.length - 1
      while (u < v) {
        c = (u + v) >> 1
        if (arr[result[c]] < arrI) {
          u = c + 1
        } else {
          v = c
        }
      }
      if (arrI < arr[result[u]]) {
        if (u > 0) {
          p[i] = result[u - 1]
        }
        result[u] = i
      }
    }
  }
  u = result.length
  v = result[u - 1]
  while (u-- > 0) {
    result[u] = v
    v = p[v]
  }
  return result
}
これをどう利用するかというと,newIndexToOldIndexMap から最長増加部分列を算出し,それを基準にして,それ以外の node を insertBefore で差し込んでいきます.
具体例
ちょっとわかりづらいので具体例です.
c1 と c2 という二つの vnode の配列を考えます.c1 が更新前で c2 が更新後で,それぞれが持つ子供はそれぞれ key 属性を持っています.(実際には key 以外の情報を持っています.)
c1 = [{ key: 'a' }, { key: 'b' }, { key: 'c' }, { key: 'd' }]
c2 = [{ key: 'a' }, { key: 'b' }, { key: 'd' }, { key: 'c' }]
これらを元にまずは keyToNewIndexMap を生成します.(key と,それに対する c2 の index の map) ※ 以下は先ほど紹介したコードです.
const keyToNewIndexMap: Map<string | number | symbol, number> = new Map()
for (i = 0; i <= e2; i++) {
  const nextChild = (c2[i] = normalizeVNode(c2[i]))
  if (nextChild.key != null) {
    keyToNewIndexMap.set(nextChild.key, i)
  }
}

// keyToNewIndexMap = { a: 0, b: 1, d: 2, c: 3 }
続いて newIndexToOldIndexMap を生成します. ※ 以下は先ほど紹介したコードです.
// 初期化

const toBePatched = c2.length
const newIndexToOldIndexMap = new Array(toBePatched) // 新indexと旧indexとのマップ
for (i = 0; i < toBePatched; i++) newIndexToOldIndexMap[i] = 0

// newIndexToOldIndexMap = [0, 0, 0, 0]// patchをしつつmove用にnewIndexToOldIndexMapを生成する
// e1 (旧 len)を元にループ
for (i = 0; i <= e1; i++) {
const prevChild = c1[i]
newIndex = keyToNewIndexMap.get(prevChild.key)
if (newIndex === undefined) {
// 移動先が見つからなければアンマウント
unmount(prevChild)
} else {
newIndexToOldIndexMap[newIndex] = i + 1 // マップ形成
patch(prevChild, c2[newIndex] as VNode, container) // パッチ処理
}
}
// newIndexToOldIndexMap = [1, 2, 4, 3]そして,得られた newIndexToOldIndexMap から最長増加部分列を取得します.(ここから新実装)
const increasingNewIndexSequence = getSequence(newIndexToOldIndexMap)
// increasingNewIndexSequence = [0, 1, 3]j = increasingNewIndexSequence.length - 1
for (i = toBePatched - 1; i >= 0; i--) {
const nextIndex = i
const nextChild = c2[nextIndex] as VNode
const anchor =
nextIndex + 1 < l2 ? (c2[nextIndex + 1] as VNode).el : parentAnchor // ※ parentAnchor はとりあえず引数で受け取った anchor だと思ってもらえれば。
if (newIndexToOldIndexMap[i] === 0) {
// newIndexToOldIndexMap は初期値が 0 なので、0 の場合は古い要素への map が存在しない、つまり新しい要素だというふうに判定している。
patch(null, nextChild, container, anchor)
} else {
// i と increasingNewIndexSequence[j] が一致しなければ move する
if (j < 0 || i !== increasingNewIndexSequence[j]) {
move(nextChild, container, anchor)
} else {
j--
}
}
}実際に実装してみよう.
さて,方針についてはざっと説明したので実際に patchKeyedChildren を実装してみましょう. Todo だけまとめておきます.
- anchor をバケツリレーできるように (move のための insert で使うので)
- c2 を元に key と index の map を用意する
- key の map を元に c2 の index と c1 の index の map を用意する
この段階で,c1 ベースのループと c2 ベースのループで patch 処理をしておく (move はまだ) - 3 で得た map を元に最長増加部分列を求める
- 4 で得た部分列と c2 を元に move する
ここからは本家 Vue の実装を見てもらってもいいですし,もちろん chibivue を参考にしてもらっても良いです. (おすすめなのは本家 Vue を実際に読みながらです.)