Minimal Reactivity System
Developer interface we aim for this time
From here, we will talk about the essence of Vue.js, which is the Reactivity System.
The previous implementation, although it looks similar to Vue.js, is not actually Vue.js in terms of functionality.
I simply implemented the initial developer interface and made it possible to display various HTML.
However, as it is, once the screen is rendered, it remains the same, and as a web application, it becomes just a static site.
From now on, we will add state to create a richer UI, and update the rendering when the state changes.
First, let's think about what kind of developer interface it will be, as usual.
How about something like this?
import { createApp, h, reactive } from 'chibivue'

const app = createApp({
  setup() {
    const state = reactive({ count: 0 })

    const increment = () => {
      state.count++
    }

    return () =>
      h('div', { id: 'my-app' }, [
        h('p', {}, [`count: ${state.count}`]),
        h('button', { onClick: increment }, ['increment']),
      ])
  },
})

app.mount('#app')
If you are used to developing with Single File Components (SFC), this may look a little unfamiliar.
This is a developer interface that uses the setup option to hold state and return a render function.
In fact, Vue.js has such notation.
https://vuejs.org/api/composition-api-setup.html#usage-with-render-functions
We define the state with the reactive function, implement a function called increment that modifies it, and bind it to the click event of the button.
To summarize what we want to do:
- Execute the
setupfunction to obtain a function for obtaining the vnode from the return value - Make the object passed to the
reactivefunction reactive - When the button is clicked, the state is updated
- Track the state updates, re-execute the render function, and redraw the screen
What is the Reactivity System?
Now, let's review what reactivity is.
Let's refer to the official documentation.
Reactive objects are JavaScript proxies that behave like normal objects. The difference is that Vue can track property access and changes on reactive objects.
One of Vue's most distinctive features is its modest Reactivity System. The state of a component is composed of reactive JavaScript objects. When the state changes, the view is updated.
In summary, "reactive objects update the screen when there are changes".
Let's put aside how to achieve this for now and implement the developer interface mentioned earlier.
Implementation of the setup function
What we need to do is very simple.
We receive the setup option and execute it, and then we can use it just like the previous render option.
Edit ~/packages/runtime-core/componentOptions.ts:
export type ComponentOptions = {
  render?: Function
  setup?: () => Function // Added
}
Then use it:
// createAppAPI

const app: App = {
  mount(rootContainer: HostElement) {
    const componentRender = rootComponent.setup!()

    const updateComponent = () => {
      const vnode = componentRender()
      render(vnode, rootContainer)
    }

    updateComponent()
  },
}// playground
import { createApp, h } from 'chibivue'
const app = createApp({
setup() {
// Define state here in the future
// const state = reactive({ count: 0 })
return function render() {
return h('div', { id: 'my-app' }, [
h('p', { style: 'color: red; font-weight: bold;' }, ['Hello world.']),
h(
'button',
{
onClick() {
alert('Hello world!')
},
},
['click me!'],
),
])
}
},
})
app.mount('#app')Well, that's it.
Actually, we want to execute this updateComponent when the state is changed.
Proxy Objects
This is the main theme for this time. I want to execute updateComponent when the state is changed somehow.
The key to this is an object called Proxy.
First, let me explain about each of them, not about the implementation method of the Reactivity System.
https://developer.mozilla.org/ja/docs/Web/JavaScript/Reference/Global_Objects/Proxy
Proxy is a very interesting object.
You can use it by passing an object as an argument and using new like this:
const o = new Proxy({ value: 1 }, {})
console.log(o.value) // 1
In this example, o behaves almost the same as a normal object.
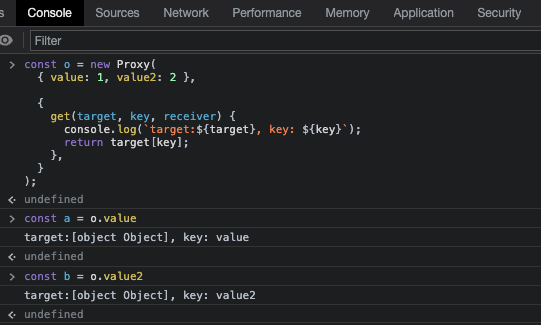
Now, what's interesting is that Proxy can take a second argument and register a handler. This handler is a handler for object operations. Please take a look at the following example:
const o = new Proxy(
  { value: 1, value2: 2 },

  {
    get(target, key, receiver) {
      console.log(`target:${target}, key: ${key}`)
      return target[key]
    },
  },
)
In this example, we are writing settings for the generated object. Specifically, when accessing (get) the properties of this object, the original object (target) and the accessed key name will be output to the console. Let's check the operation in a browser or something.
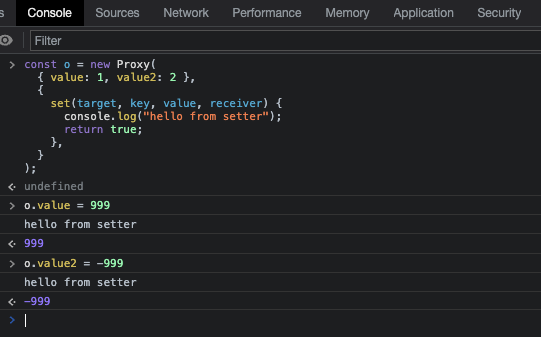
You can see that the set processing set for reading the value from the property of the object generated by this Proxy is being executed.
Similarly, you can also set it for set.
const o = new Proxy(
  { value: 1, value2: 2 },
  {
    set(target, key, value, receiver) {
      console.log('hello from setter')
      target[key] = value
      return true
    },
  },
)
This is the extent of understanding Proxy.
Trying to achieve Reactivity System with Proxy
WARNING
Vue 3.4 was released at the end of December 2023, which includes improvements to reactivity performance.
You should note that this online book is referencing the previous implementation.
There are no major changes in this chapter, but the file structure may be slightly different and some code may have been modified.
This online book will be updated accordingly at the appropriate time.
To clarify the purpose again, the purpose this time is to "execute updateComponent when the state is changed". Let me explain the implementation process using Proxy.
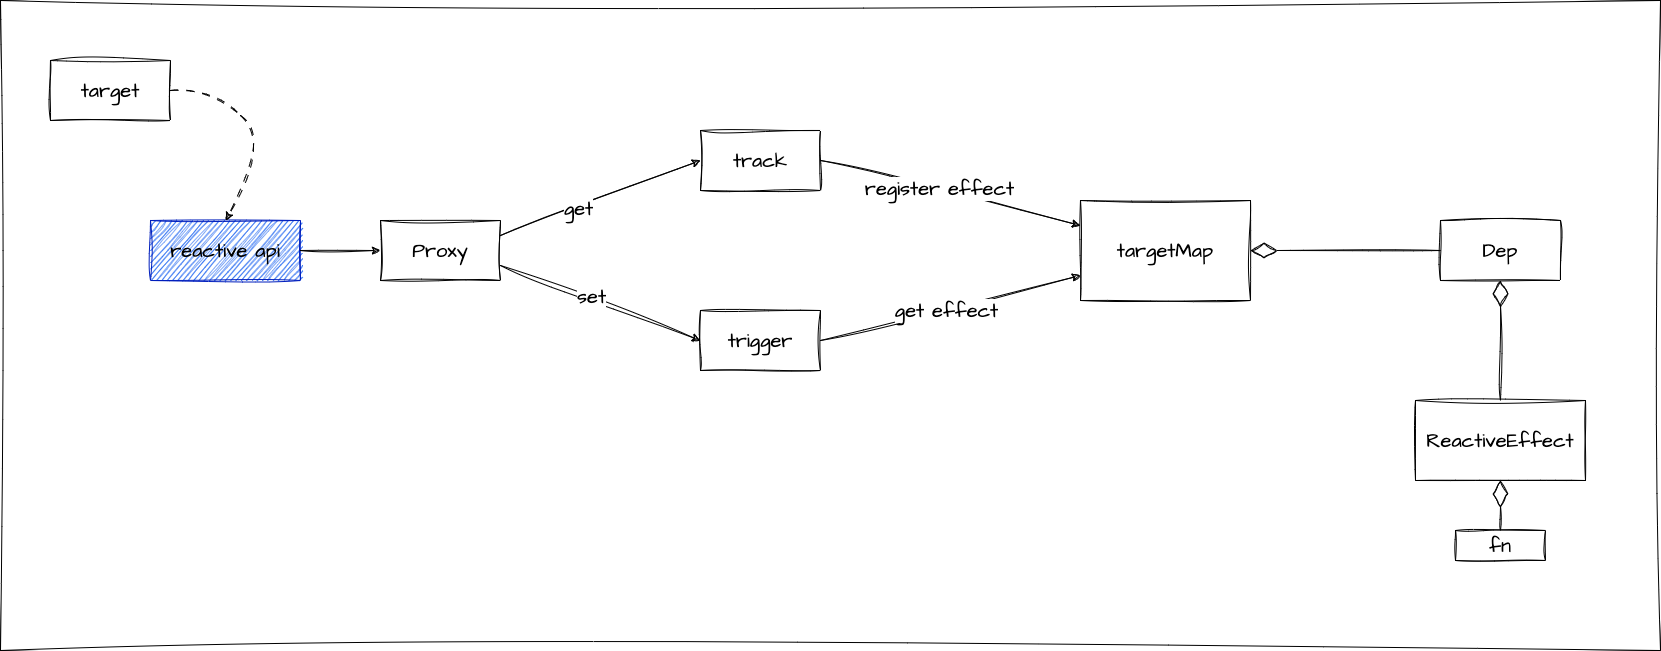
First, Vue.js's Reactivity System involves target, Proxy, ReactiveEffect, Dep, track, trigger, targetMap, and activeEffect.
First, let's talk about the structure of targetMap. targetMap is a mapping of keys and deps for a certain target. Target refers to the object you want to make reactive, and dep refers to the effect (function) you want to execute. You can think of it that way. In code, it looks like this:
type Target = any // any target
type TargetKey = any // any key that the target has

const targetMap = new WeakMap<Target, KeyToDepMap>() // defined as a global variable in this module

type KeyToDepMap = Map<TargetKey, Dep> // a map of target's key and effect

type Dep = Set<ReactiveEffect> // dep has multiple ReactiveEffects

class ReactiveEffect {
  constructor(
    // here, you give the function you want to actually apply as an effect (in this case, updateComponent)
    public fn: () => T,
  ) {}
}
This basic structure is responsible for the rest, and then we think about how to create (register) targetMap and how to execute the effect.
That's where the concepts of track and trigger come in. As the names suggest, track is a function that registers in targetMap, and trigger is a function that retrieves the effect from targetMap and executes it.
export function track(target: object, key: unknown) {
  // ..
}

export function trigger(target: object, key?: unknown) {
  // ..
}
And these track and trigger are implemented in the get and set handlers of Proxy.
const state = new Proxy(
  { count: 1 },
  {
    get(target, key, receiver) {
      track(target, key)
      return target[key]
    },
    set(target, key, value, receiver) {
      target[key] = value
      trigger(target, key)
      return true
    },
  },
)
The API for generating this Proxy is the reactive function.
function reactive<T>(target: T) {
  return new Proxy(target, {
    get(target, key, receiver) {
      track(target, key)
      return target[key]
    },
    set(target, key, value, receiver) {
      target[key] = value
      trigger(target, key)
      return true
    },
  })
}
Here, you may notice one missing element. That is, "which function to register in track?". The answer is the concept of activeEffect. This is also defined as a global variable in this module, just like targetMap, and is set in the run method of ReactiveEffect.
let activeEffect: ReactiveEffect | undefined

class ReactiveEffect {
  constructor(
    // here, you give the function you want to actually apply as an effect (in this case, updateComponent)
    public fn: () => T,
  ) {}

  run() {
    activeEffect = this
    return this.fn()
  }
}
To understand how it works, imagine a component like this.
{
  setup() {
    const state = reactive({ count: 0 });
    const increment = () => state.count++;

    return function render() {
      return h("div", { id: "my-app" }, [
        h("p", {}, [`count: ${state.count}`]),
        h(
          "button",
          {
            onClick: increment,
          },
          ["increment"]
        ),
      ]);
    };
  },
}
Internally, this is how reactivity is formed.
// Implementation inside chibivue
const app: App = {
mount(rootContainer: HostElement) {
const componentRender = rootComponent.setup!()
const updateComponent = () => {
const vnode = componentRender()
render(vnode, rootContainer)
}
const effect = new ReactiveEffect(updateComponent)
effect.run()
},
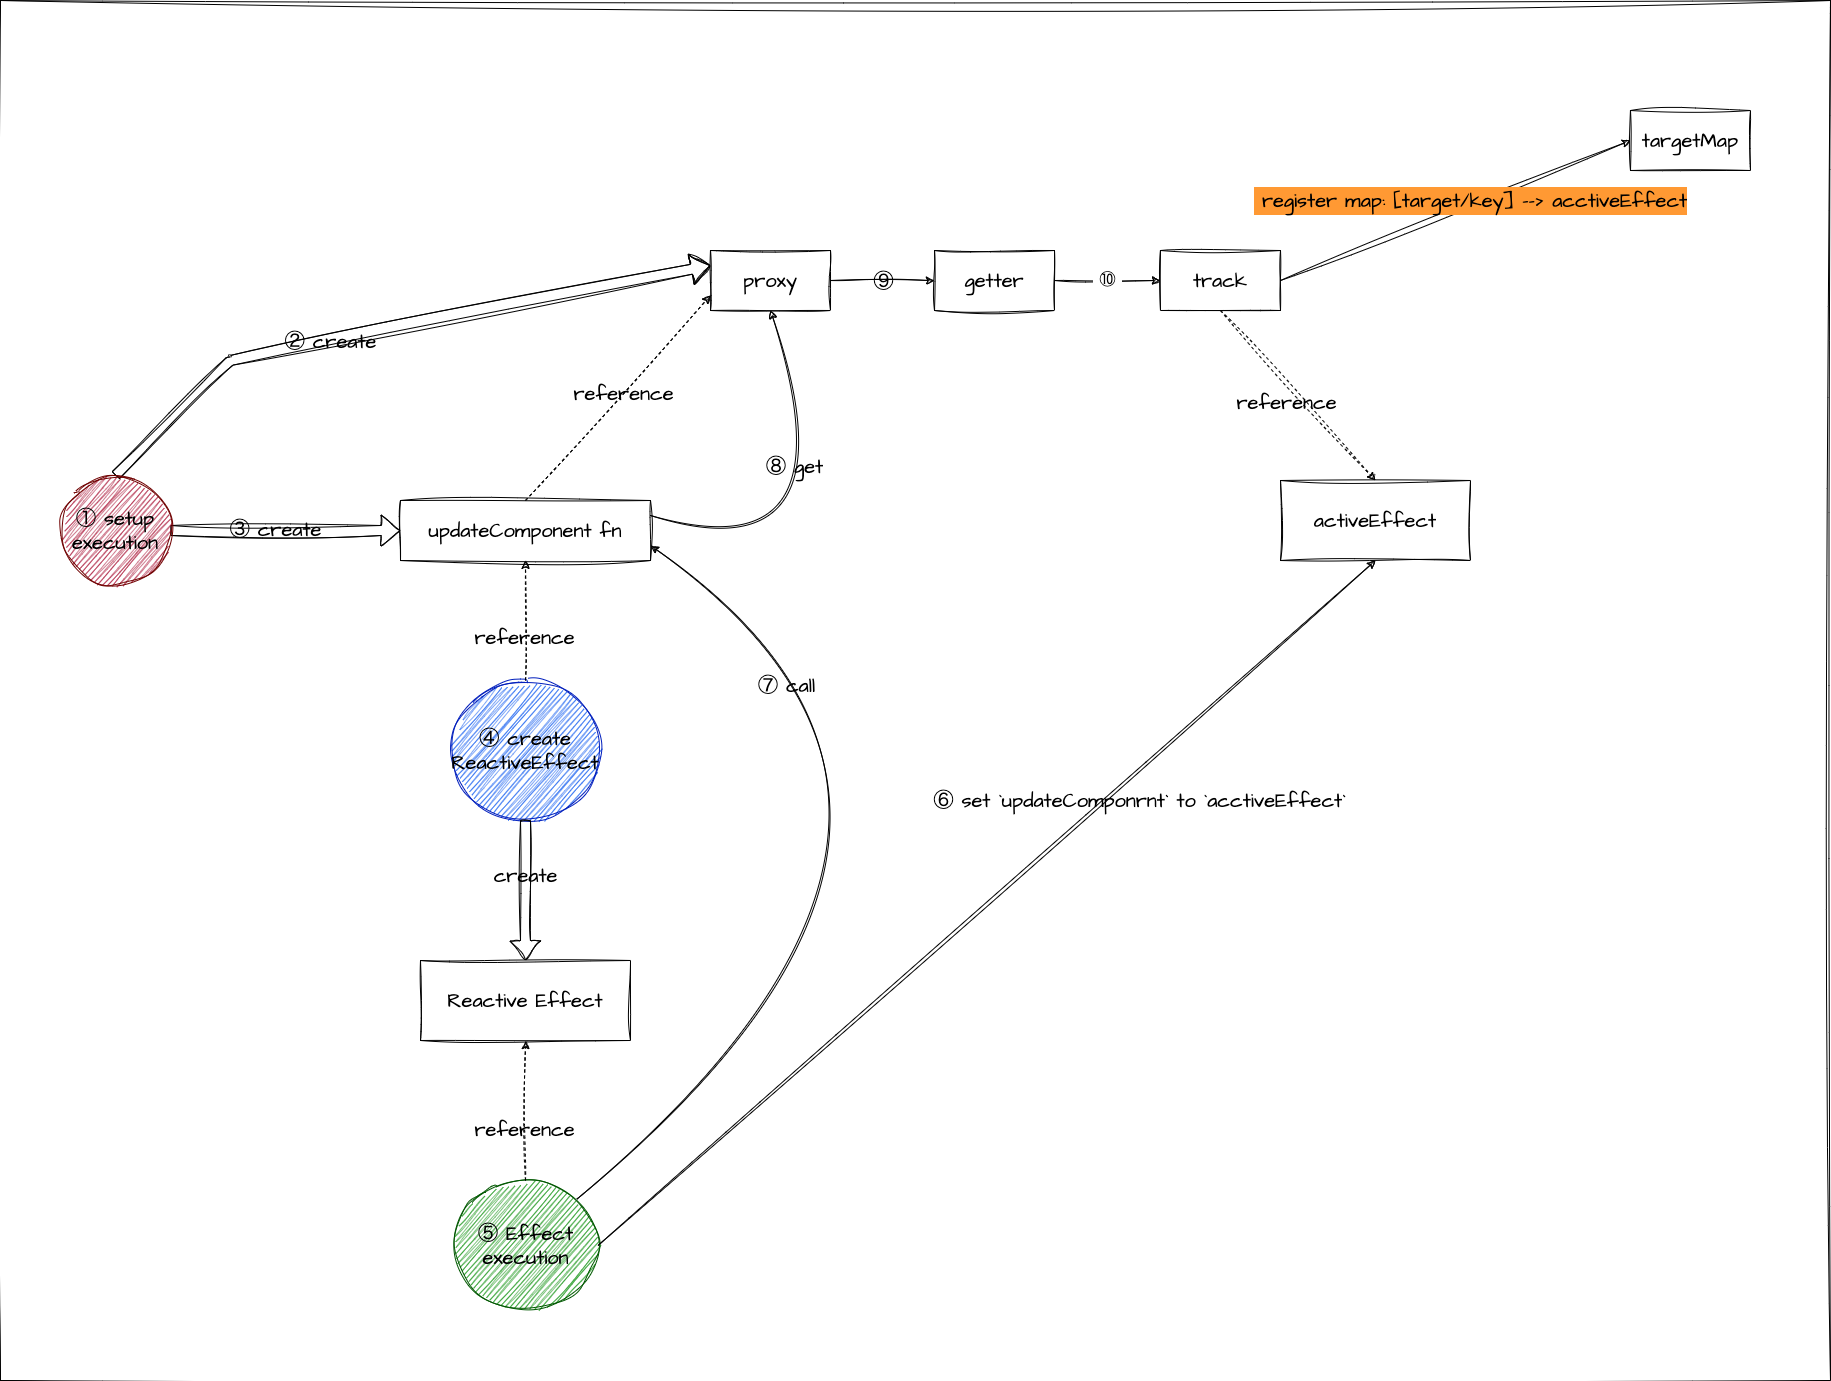
}To explain step by step, first, the setup function is executed.
A reactive proxy is generated at this point. In other words, any operation performed on the proxy created here will behave as configured in the proxy.
const state = reactive({ count: 0 }) // Generating a proxyNext, we pass updateComponent to create a ReactiveEffect (Observer side).
const effect = new ReactiveEffect(updateComponent)The componentRender used in updateComponent is a function that is the return value of setup, and this function references the object created by the proxy.
function render() {
  return h('div', { id: 'my-app' }, [
    h('p', {}, [`count: ${state.count}`]), // Referencing the object created by the proxy
    h(
      'button',
      {
        onClick: increment,
      },
      ['increment'],
    ),
  ])
}
When this function is actually executed, the getter function of state.count is executed, and track is triggered. In this situation, let's execute the effect.
effect.run()Then, updateComponent (a ReactiveEffect with updateComponent) is set to activeEffect. When track is triggered in this state, a map of state.count and updateComponent (a ReactiveEffect with updateComponent) is registered in targetMap. This is how reactivity is formed.
Now, let's consider what happens when increment is executed. Since increment is rewriting state.count, the setter is executed, and trigger is triggered. trigger finds and executes the effect (in this case, updateComponent) from targetMap based on state and count. This is how the screen update is triggered!
This allows us to achieve reactivity.
It's a bit complicated, so let's summarize it in a diagram.
Based on these, let's implement it.
The most difficult part is understanding everything up to this point, so once you understand it, all you have to do is write the source code. However, even if you understand only the above, there may be some people who cannot understand it without knowing what is actually happening. For those people, let's try implementing it here first. Then, while reading the actual code, please refer back to the previous section!
First, let's create the necessary files. We will create them in packages/reactivity. Here, we will try to be conscious of the configuration of the original Vue as much as possible.
pwd # ~
mkdir packages/reactivity

touch packages/reactivity/index.ts

touch packages/reactivity/dep.ts
touch packages/reactivity/effect.ts
touch packages/reactivity/reactive.ts
touch packages/reactivity/baseHandler.ts
As usual, index.ts just exports, so I won't explain it in detail. Export what you want to use from the reactivity external package here.
Next is dep.ts.
import { type ReactiveEffect } from './effect'

export type Dep = Set<ReactiveEffect>

export const createDep = (effects?: ReactiveEffect[]): Dep => {
  const dep: Dep = new Set<ReactiveEffect>(effects)
  return dep
}
There is no definition of effect yet, but we will implement it later, so it's okay.
Next is effect.ts.
import { Dep, createDep } from './dep'

type KeyToDepMap = Map<any, Dep>
const targetMap = new WeakMap<any, KeyToDepMap>()

export let activeEffect: ReactiveEffect | undefined

export class ReactiveEffect<T = any> {
  constructor(public fn: () => T) {}

  run() {
    // ※ Save the activeEffect before executing fn and restore it after execution.
    // If you don't do this, it will be overwritten one after another and behave unexpectedly. (Let's restore it to its original state when you're done)
    let parent: ReactiveEffect | undefined = activeEffect
    activeEffect = this
    const res = this.fn()
    activeEffect = parent
    return res
  }
}

export function track(target: object, key: unknown) {
  let depsMap = targetMap.get(target)
  if (!depsMap) {
    targetMap.set(target, (depsMap = new Map()))
  }

  let dep = depsMap.get(key)
  if (!dep) {
    depsMap.set(key, (dep = createDep()))
  }

  if (activeEffect) {
    dep.add(activeEffect)
  }
}

export function trigger(target: object, key?: unknown) {
  const depsMap = targetMap.get(target)
  if (!depsMap) return

  const dep = depsMap.get(key)

  if (dep) {
    const effects = [...dep]
    for (const effect of effects) {
      effect.run()
    }
  }
}
I haven't explained the contents of track and trigger so far, but they simply register and retrieve from targetMap and execute them, so please try to read them carefully.
Next is baseHandler.ts. Here, we define the handler for the reactive proxy. Well, you can implement it directly in reactive, but I followed the original Vue because it is like this. In reality, there are various proxies such as readonly and shallow, so the idea is to implement the handlers for those proxies here. (We won't do it this time, though)
import { track, trigger } from './effect'
import { reactive } from './reactive'

export const mutableHandlers: ProxyHandler<object> = {
  get(target: object, key: string | symbol, receiver: object) {
    track(target, key)

    const res = Reflect.get(target, key, receiver)
    // If it is an object, make it reactive (this allows nested objects to be reactive as well).
    if (res !== null && typeof res === 'object') {
      return reactive(res)
    }

    return res
  },

  set(target: object, key: string | symbol, value: unknown, receiver: object) {
    let oldValue = (target as any)[key]
    Reflect.set(target, key, value, receiver)
    // check if the value has changed
    if (hasChanged(value, oldValue)) {
      trigger(target, key)
    }
    return true
  },
}

const hasChanged = (value: any, oldValue: any): boolean =>
  !Object.is(value, oldValue)
Here, Reflect appears, which is similar to Proxy, but while Proxy is for writing meta settings for objects, Reflect is for performing operations on existing objects. Both Proxy and Reflect are APIs for meta programming related to objects in the JS engine, and they allow you to perform meta operations compared to using objects normally. You can execute functions that change the object, execute functions that read the object, and check if a key exists, and perform various meta operations. For now, it's okay to understand that Proxy is for meta settings at the stage of creating an object, and Reflect is for meta operations on existing objects.
Next is reactive.ts.
import { mutableHandlers } from './baseHandler'

export function reactive<T extends object>(target: T): T {
  const proxy = new Proxy(target, mutableHandlers)
  return proxy as T
}
Now that the implementation of reactive is complete, let's try using them when mounting. ~/packages/runtime-core/apiCreateApp.ts.
import { ReactiveEffect } from '../reactivity'

export function createAppAPI<HostElement>(
  render: RootRenderFunction<HostElement>,
): CreateAppFunction<HostElement> {
  return function createApp(rootComponent) {
    const app: App = {
      mount(rootContainer: HostElement) {
        const componentRender = rootComponent.setup!()

        const updateComponent = () => {
          const vnode = componentRender()
          render(vnode, rootContainer)
        }

        // From here
        const effect = new ReactiveEffect(updateComponent)
        effect.run()
        // To here
      },
    }

    return app
  }
}
Now, let's try it in the playground.
import { createApp, h, reactive } from 'chibivue'
const app = createApp({
setup() {
const state = reactive({ count: 0 })
const increment = () => {
state.count++
}
return function render() {
return h('div', { id: 'my-app' }, [
h('p', {}, [`count: ${state.count}`]),
h('button', { onClick: increment }, ['increment']),
])
}
},
})
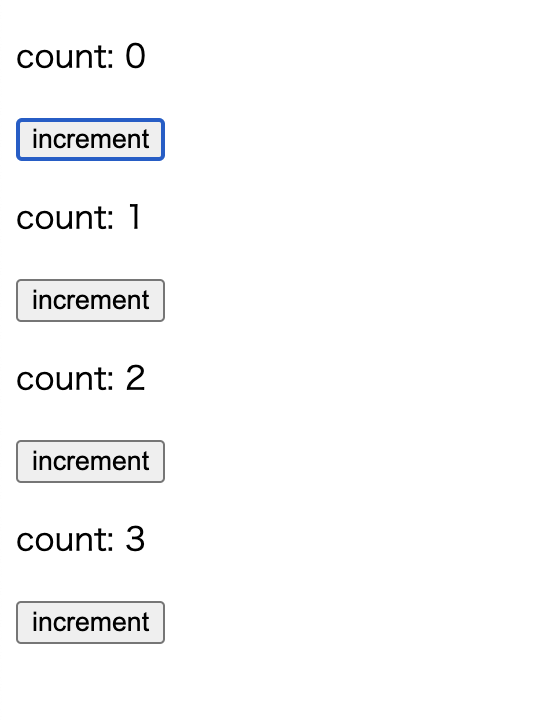
app.mount('#app')Oops...
The rendering is working fine now, but something seems off. Well, it's not surprising because in updateComponent, we create elements every time. So, let's remove all the elements before each rendering.
Modify the render function in ~/packages/runtime-core/renderer.ts like this:
const render: RootRenderFunction = (vnode, container) => {
  while (container.firstChild) container.removeChild(container.firstChild) // Add code to remove all elements
  const el = renderVNode(vnode)
  hostInsert(el, container)
}
Now, how about this?

Now it seems to be working fine!
Now we can update the screen with reactive!
Source code up to this point: GitHub