Scheduler
Scheduling Effects
First, take a look at this code:
import { createApp, h, reactive } from 'chibivue'

const app = createApp({
  setup() {
    const state = reactive({
      message: 'Hello World',
    })
    const updateState = () => {
      state.message = 'Hello ChibiVue!'
      state.message = 'Hello ChibiVue!!'
    }

    return () => {
      console.log('😎 rendered!')

      return h('div', { id: 'app' }, [
        h('p', {}, [`message: ${state.message}`]),
        h('button', { onClick: updateState }, ['update']),
      ])
    }
  },
})

app.mount('#app')
When the button is clicked, the set function is called twice on state.message, so naturally, the trigger function will be executed twice as well. This means that the Virtual DOM will be computed twice and the patching will be performed twice.

However, in reality, patching only needs to be done once, during the second trigger.
Therefore, we will implement a scheduler. A scheduler is responsible for managing the execution order and control of tasks. One of the roles of the Vue scheduler is to manage reactive effects in a queue and consolidate them if possible.
Scheduling with Queue Management
Specifically, we will have a queue to manage jobs. Each job has an ID, and when a new job is enqueued, if there is already a job with the same ID in the queue, it will be overwritten.
export interface SchedulerJob extends Function {
  id?: number
}

const queue: SchedulerJob[] = []

export function queueJob(job: SchedulerJob) {
  if (
    !queue.length ||
    !queue.includes(job, isFlushing ? flushIndex + 1 : flushIndex)
  ) {
    if (job.id == null) {
      queue.push(job)
    } else {
      queue.splice(findInsertionIndex(job.id), 0, job)
    }
    queueFlush()
  }
}
As for the job ID, in this case, we want to group them by component, so we will assign a unique identifier (UID) to each component and use them as the job IDs.
The UID is simply an identifier obtained by incrementing a counter.
ReactiveEffect and Scheduler
Currently, the ReactiveEffect has the following interface (partially omitted):
class ReactiveEffect {
  public fn: () => T,

  run() {}
}
With the implementation of the scheduler, let's make a slight change.
Currently, we register a function to fn as an effect, but this time, let's divide it into "actively executed effects" and "passively executed effects".
Reactive effects can be actively executed by the side that sets the effect, or they can be passively executed by being triggered by some external action after being added to a dependency (dep).
For the latter type of effect, which is added to multiple depsMap and triggered by multiple sources, scheduling is necessary (on the other hand, if it is explicitly called actively, such scheduling is not necessary).
Let's consider a specific example. In the setupRenderEffect function of the renderer, you may have the following implementation:
const effect = (instance.effect = new ReactiveEffect(() => componentUpdateFn))
const update = (instance.update = () => effect.run())
update()
The effect created here, which is a reactiveEffect, will later be tracked by a reactive object when the setup function is executed. This clearly requires implementation of scheduling (because it will be triggered from various places).
However, regarding the update() function being called here, it should simply execute the effect, so scheduling is not necessary.
You might think, "Can't we just call componentUpdateFn directly then?" But please remember the implementation of the run function. Simply calling componentUpdateFn does not set the activeEffect.
So, let's separate the "actively executed effects" and the "passively executed effects (effects that require scheduling)".
As the final interface in this chapter, it will look like this:
// The first argument of ReactiveEffect is the actively executed effect, and the second argument is the passively executed effect
const effect = (instance.effect = new ReactiveEffect(componentUpdateFn, () =>
  queueJob(update),
))
const update: SchedulerJob = (instance.update = () => effect.run())
update.id = instance.uid
update()
In terms of implementation, in addition to fn, the ReactiveEffect will have a scheduler function, and in the triggerEffect function, the scheduler will be executed first if it exists.
export type EffectScheduler = (...args: any[]) => any;

export class ReactiveEffect<T = any> {
  constructor(
    public fn: () => T,
    public scheduler: EffectScheduler | null = null
  );
}function triggerEffect(effect: ReactiveEffect) {
if (effect.scheduler) {
effect.scheduler()
} else {
effect.run() // If there is no scheduler, execute the effect normally
}
}Now, let's implement scheduling with queue management and the classification of effects while reading the source code!
Source code up to this point:
chibivue (GitHub)
We want nextTick
If you have read the source code when implementing the scheduler, you may have noticed the appearance of "nextTick" and wondered if it is used here. First, let's talk about the task we want to achieve this time. Please take a look at this code:
import { createApp, h, reactive } from 'chibivue'

const app = createApp({
  setup() {
    const state = reactive({
      count: 0,
    })
    const updateState = () => {
      state.count++

      const p = document.getElementById('count-p')
      if (p) {
        console.log('😎 p.textContent', p.textContent)
      }
    }

    return () => {
      return h('div', { id: 'app' }, [
        h('p', { id: 'count-p' }, [`${state.count}`]),
        h('button', { onClick: updateState }, ['update']),
      ])
    }
  },
})

app.mount('#app')
Try clicking this button and take a look at the console.
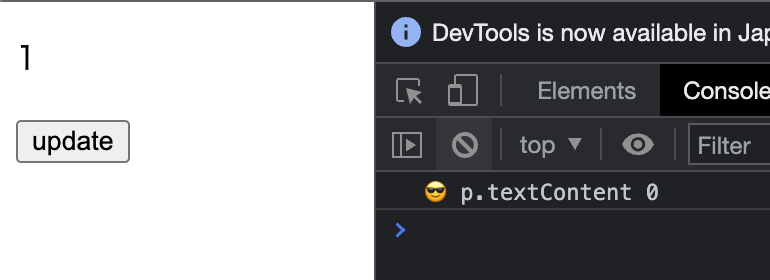
Even though we output to the console after updating state.count, the information is outdated. This is because the DOM is not instantly updated when the state is updated, and at the time of console output, the DOM is still in the old state.
This is where "nextTick" comes in.
https://vuejs.org/api/general.html#nexttick
"nextTick" is an API of the scheduler that allows you to wait until the DOM changes are applied by the scheduler. The implementation of "nextTick" is very simple. It just keeps the job (promise) being flushed in the scheduler and connects it to "then".
export function nextTick<T = void>(
  this: T,
  fn?: (this: T) => void,
): Promise<void> {
  const p = currentFlushPromise || resolvedPromise
  return fn ? p.then(this ? fn.bind(this) : fn) : p
}
When the job is completed (the promise is resolved), the callback passed to "nextTick" is executed. (If there is no job in the queue, it is connected to "then" of "resolvedPromise") Naturally, "nextTick" itself also returns a Promise, so as a developer interface, you can pass a callback or await "nextTick".
import { createApp, h, reactive, nextTick } from 'chibivue'

const app = createApp({
  setup() {
    const state = reactive({
      count: 0,
    })
    const updateState = async () => {
      state.count++

      await nextTick() // Wait
      const p = document.getElementById('count-p')
      if (p) {
        console.log('😎 p.textContent', p.textContent)
      }
    }

    return () => {
      return h('div', { id: 'app' }, [
        h('p', { id: 'count-p' }, [`${state.count}`]),
        h('button', { onClick: updateState }, ['update']),
      ])
    }
  },
})

app.mount('#app')
Now, let's actually rewrite the implementation of the current scheduler to keep "currentFlushPromise" and implement "nextTick"!
Source code up to this point:
chibivue (GitHub)